[CloudFormation] CFnで環境作り完全版 Part5. ロードバランサー, CDN編
目次
Introduction
前回でドメインと証明書を設定したので、今回でロードバランサーをやっと作成できます。
今回は作成するリソースが多いので少し長いかもしれません。
今回作成するもの
AWSリソース
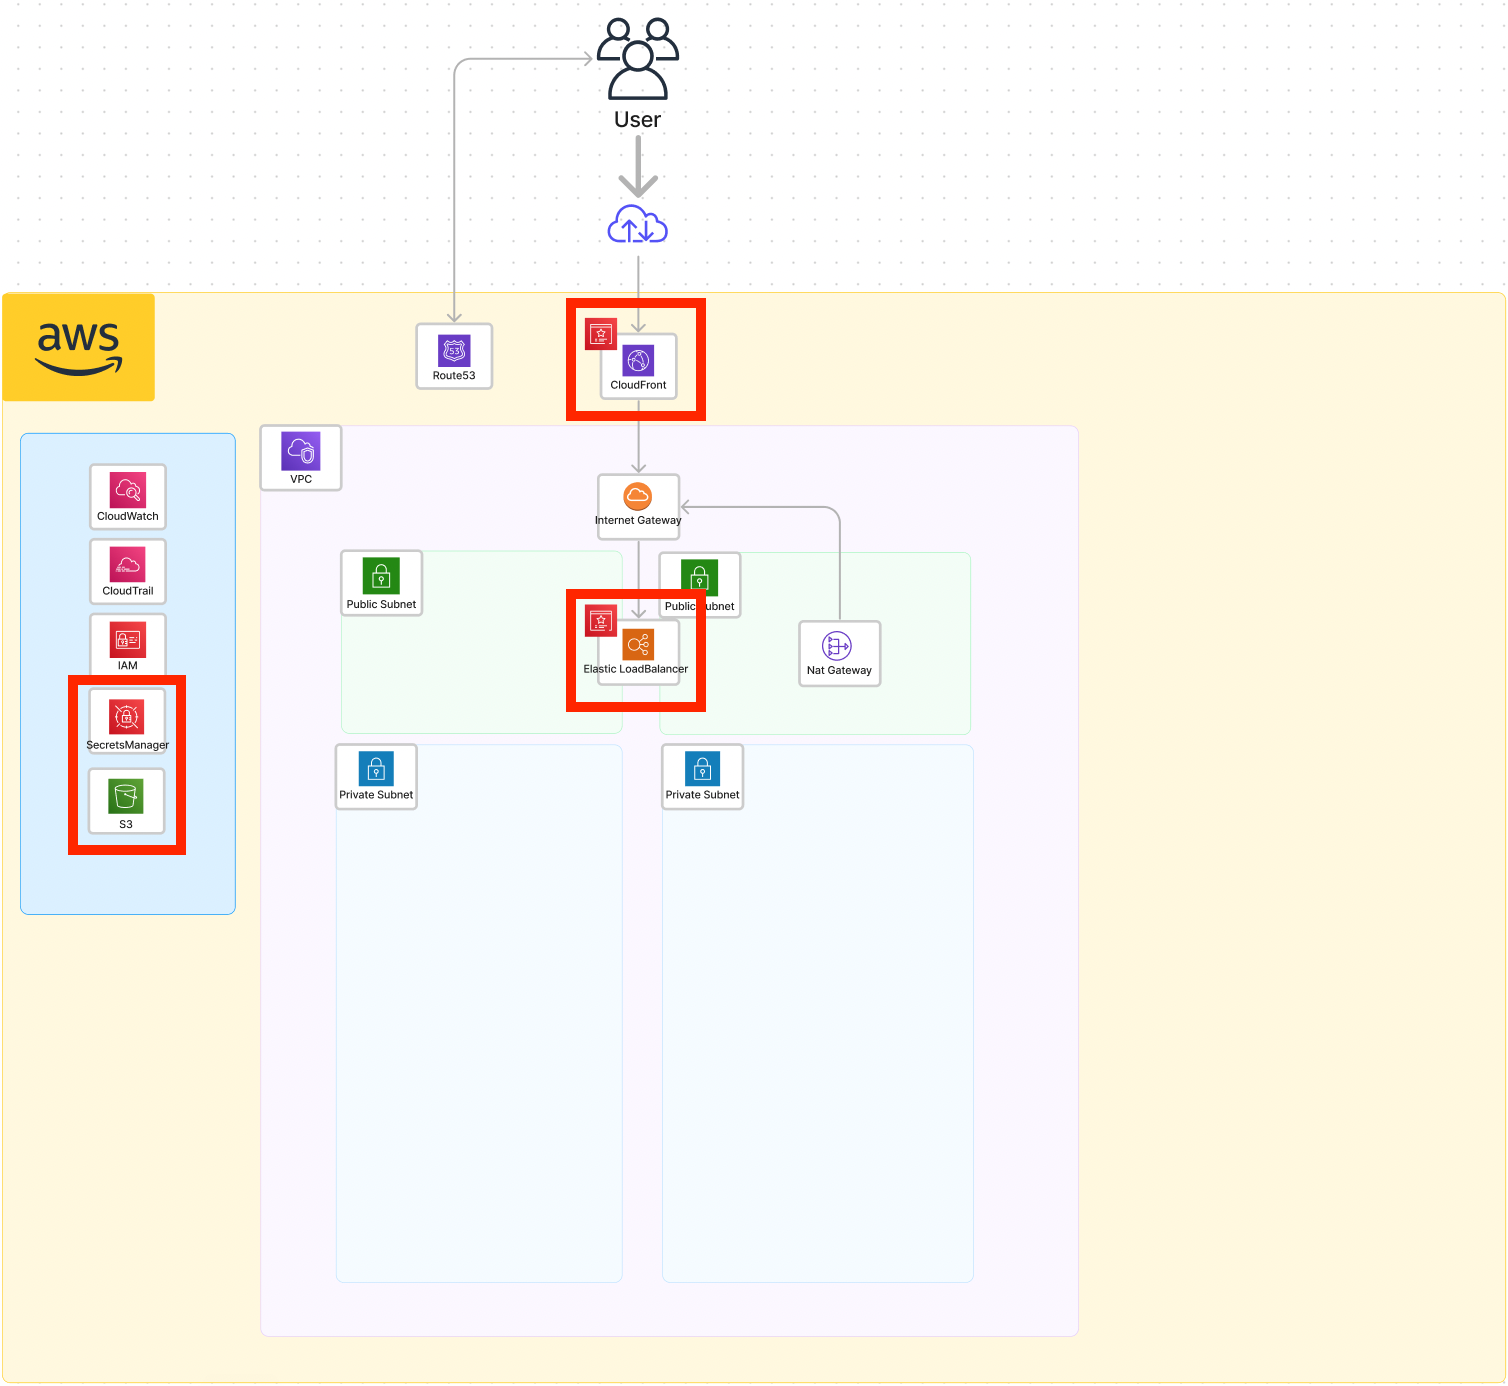
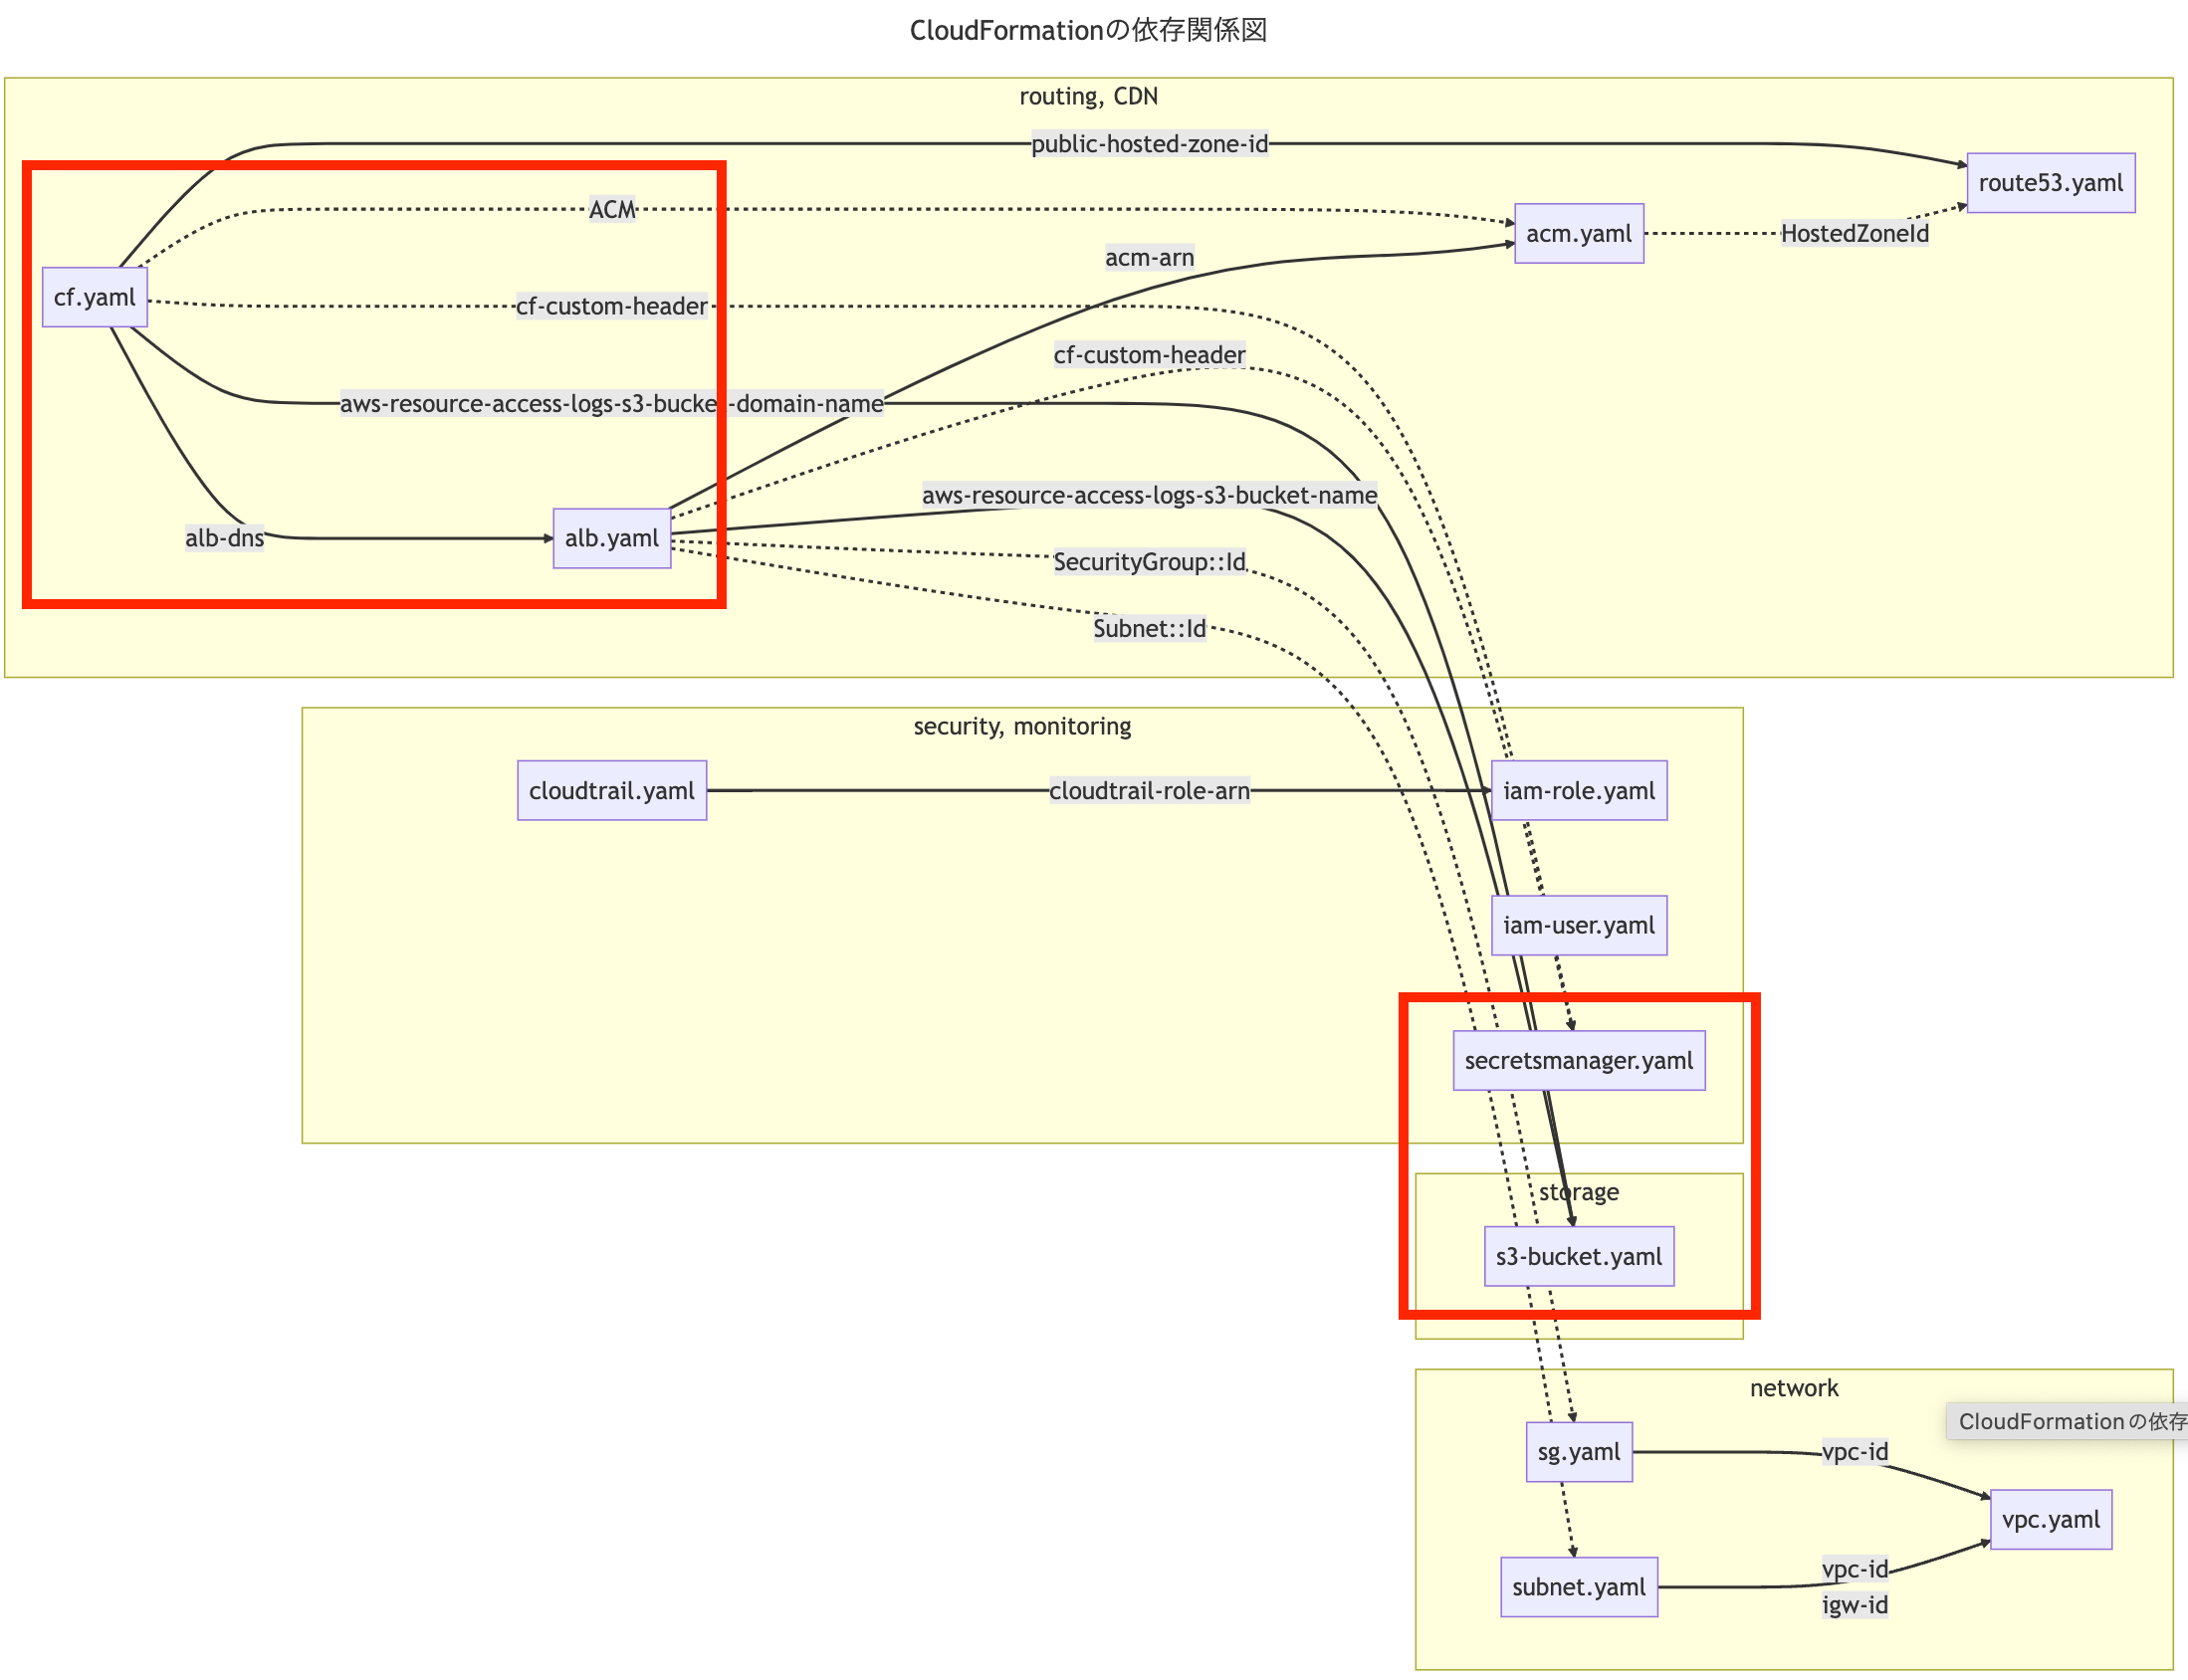
CFn相関図
HandsOn
アクセスログを保存するS3作成
ロードバランサーとCloudFrontを作成していくのですが、リソースにアクセスがきた際のアクセスログを保存して置くのは基本です。攻撃された時の調査やユーザーへ提供するサービスであればユーザーの行動の調査などログの使用用途は様々です。必ずログは保存するようにしましょう。 リソースのログを保存する場所としてS3を作成します。
.pre-commit-config.yaml
cloudformation
 L iam-user.yaml
   iam-role.yaml
   cloudtrail.yaml
   vpc.yaml
   subnet.yaml
   sg.yaml
   route53.yaml
   acm.yaml
   s3-bucket.yaml(new)
AWSTemplateFormatVersion: "2010-09-09"
Description: "stackName: s3-bucket. AWS::S3::Bucket"

Parameters:
  Project:
    Type: String
    Description: Project Name
    Default: example

Mappings:
  EnvMaps:
    Common:
      ApNortheast1ElbAccountId: "582318560864" # https://docs.aws.amazon.com/ja_jp/elasticloadbalancing/latest/application/enable-access-logging.html

Resources:
  S3LogsS3Bucket:
    Type: AWS::S3::Bucket
    Properties:
      BucketName: !Sub ${Project}-s3-logs
      AccessControl: LogDeliveryWrite
      OwnershipControls:
        Rules:
          - ObjectOwnership: ObjectWriter
      VersioningConfiguration:
        Status: Suspended

  AwsResourceAccessLogsS3Bucket:
    Type: AWS::S3::Bucket
    Properties:
      BucketName: !Sub ${Project}-aws-resource-access-logs
      AccessControl: Private
      OwnershipControls:
        Rules:
          - ObjectOwnership: ObjectWriter
      VersioningConfiguration:
        Status: Suspended
      LifecycleConfiguration:
        Rules:
          - Id: ExpireAfter90Days
            Status: Enabled
            ExpirationInDays: 90
      LoggingConfiguration:
        DestinationBucketName: !Ref S3LogsS3Bucket
        LogFilePrefix: !Sub ${Project}-aws-resource-access-logs/
  AwsResourceAccessLogsS3BucketPolicy:
    Type: AWS::S3::BucketPolicy
    Properties:
      Bucket: !Ref AwsResourceAccessLogsS3Bucket
      PolicyDocument:
        Version: "2012-10-17"
        Statement:
          - Sid: Policy4ALB
            Effect: Allow
            Principal:
              AWS: !Sub
                - arn:aws:iam::${ElbAccountId}:root
                - ElbAccountId: !FindInMap [EnvMaps, Common, ApNortheast1ElbAccountId]
            Action:
              - s3:PutObject
            Resource: !Sub
              - ${BucketArn}/elb/*
              - BucketArn: !GetAtt AwsResourceAccessLogsS3Bucket.Arn

Outputs:
  AwsResourceAccessLogsS3BucketName:
    Description: Output Export AWS::S3::Bucket.Ref AwsResourceAccessLogsS3Bucket
    Value: !Ref AwsResourceAccessLogsS3Bucket
    Export:
      Name: !Sub ${Project}-aws-resource-access-logs-s3-bucket-name
  AwsResourceAccessLogsS3BucketArn:
    Description: Output Export AWS::S3::Bucket.Arn AwsResourceAccessLogsS3Bucket
    Value: !GetAtt AwsResourceAccessLogsS3Bucket.Arn
    Export:
      Name: !Sub ${Project}-aws-resource-access-logs-s3-bucket-arn
  AwsResourceAccessLogsS3BucketDomainName:
    Description: Output Export AWS::S3::Bucket.DomainName AwsResourceAccessLogsS3Bucket
    Value: !GetAtt AwsResourceAccessLogsS3Bucket.DomainName
    Export:
      Name: !Sub ${Project}-aws-resource-access-logs-s3-bucket-domain-name
スタック名は、s3-bucket
ポイントは以下になります
- ALBやCloudFrontなどのAWSリソースアクセスログは、AwsResourceAccessLogsS3Bucketに集約させる。 これは好みですね。自分はバケットが乱立するのが嫌なので1つに集約させます。
- アクセスログのバケットのログは90日間のみ保持。 これも状況に応じてですね。あまりに長く保持すると値段も膨れ上がるので保存期間は決めた方が良いです。しかし保持期間が短すぎるのも問題なのでちょうど良い間隔にすること良いです。本番運用するなら半年は保持したいですね。
- バケットの操作ログを保存するバケットを作成。 はいこれも状況に応じて任意にやっていただければ、私は保存できるものは保存したいタイプなので
- ロードバランサーのログ保存を許可するバケットポリシー https://docs.aws.amazon.com/ja_jp/elasticloadbalancing/latest/application/enable-access-logging.html
- バケットのバージョニングはできればやった方がいいですが、データ量が大きくなってしまうので今回は無効化しています。
SecretsManager
CloudFront経由でしかロードバランサーにアクセスできないようにカスタムヘッダーを付与します。
カスタムヘッダーは知られるとロードバランサーに直接アクセスされてしまうので機密情報としてSecretsManagerで管理します。
AWS公式のApplication Load Balancers へのアクセスを制限するを参考にしています。
.pre-commit-config.yaml
cloudformation
 L iam-user.yaml
   iam-role.yaml
   cloudtrail.yaml
   vpc.yaml
   subnet.yaml
   sg.yaml
   route53.yaml
   acm.yaml
   s3-bucket.yaml
   secretsmanager.yaml(new)
AWSTemplateFormatVersion: "2010-09-09"
Description: "stackName: secretsmanager. AWS::SecretsManager::Secret"

Parameters:
  CloudfrontCustomHeaderName:
    Type: String
    Description: CloudFront Custom Header Name
    Default: X-Custom-Header
    NoEcho: true
  CloudfrontCustomHeaderValue:
    Type: String
    Description: CloudFront Custom Header Value
    NoEcho: true

Resources:
  CFCustomHeader:
    Type: AWS::SecretsManager::Secret
    Properties:
      Description: CloudFront custom headers to limit ALB connections
      KmsKeyId: alias/aws/secretsmanager
      Name: cf-custom-header
      SecretString: !Sub '{"CLOUDFRONT_CUSTOM_HEADER_NAME":"${CloudfrontCustomHeaderName}","CLOUDFRONT_CUSTOM_HEADER_VALUE":"${CloudfrontCustomHeaderValue}"}'
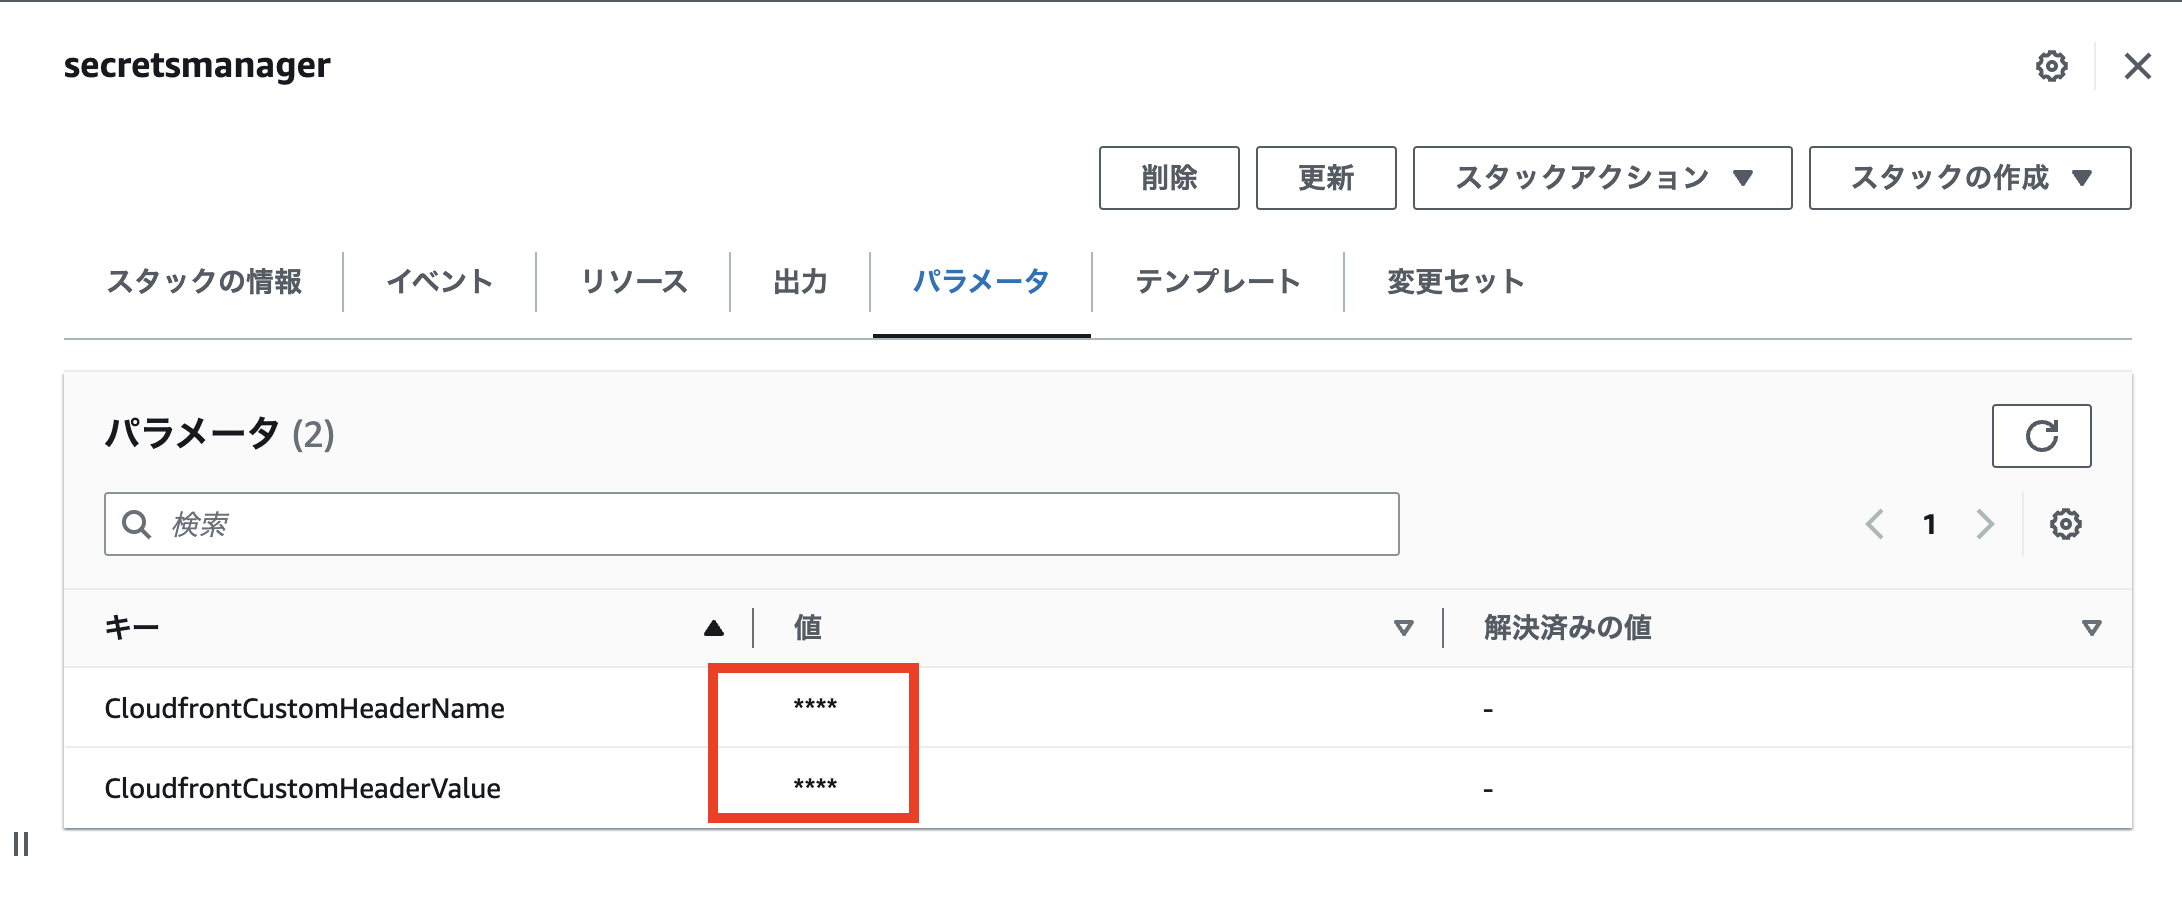
スタック名はsecretsmanager
ParametersのCloudfrontCustomHeaderNameとCloudfrontCustomHeaderValueは基本的になんでも良いですが、特定されにくい文字列を入力してください。特にCloudfrontCustomHeaderValueは特定されないようにパスワードと同じレベルで扱ってください。
ParametersのプロパティにNoEcho: trueがあると思いますが、これは入力したパラメータがスタック作成後にマスクされて見えないようになります。
ALB
次にロードバランサーを作成していきます。今回作成するロードバランサーはCloudWatchなどでリクエストカウントなどの詳細なメトリクスが見たいためアプリケーションロードバランサーを選択します。
また、今回ロードバランサーなどこれから作成するAWSリソースは、命名にプレフィックスを含ませます。その理由は、同じ構成で複数作成する可能性があるからです。
Prefixはデフォルトでv1になっているのですが、サイトのリニューアルやリプレイスで環境をまるっと変更するときにインフラリソースも作成し直してroute53で向き先を古いリソースから新しいリソースに変更してリプレイスすることもあるため複製できるようにPrefixを含む命名とディレクトリもPrefixで一階層深くしようかと思います。
.pre-commit-config.yaml
cloudformation
 L iam-user.yaml
   iam-role.yaml
   cloudtrail.yaml
   vpc.yaml
   subnet.yaml
   sg.yaml
   route53.yaml
   acm.yaml
   s3-bucket.yaml
   secretsmanager.yaml
   prefix
    L alb.yaml(new)
AWSTemplateFormatVersion: "2010-09-09"
Description: "stackName: {Prefix}-{Env}-alb. AWS::ElasticLoadBalancingV2::LoadBalancer AWS::ElasticLoadBalancingV2::Listener AWS::ElasticLoadBalancingV2::ListenerRule AWS::ElasticLoadBalancingV2::TargetGroup"
Metadata:
AWS::CloudFormation::Interface:
ParameterGroups:
- Label:
default: Environment Name Configuration
Parameters:
- Prefix
- Env
- Project
- Label:
default: Network And Security Configuration
Parameters:
- VpcId
- SubnetId
- SecurityGroup
Parameters:
Prefix:
Type: String
Description: AWS resource version management prefix
Default: v1
Env:
Type: String
Description: Project environment
AllowedValues: [dev, prd]
Project:
Type: String
Description: Project Name
Default: example
VpcId:
Type: AWS::EC2::VPC::Id
Description: "VPC for ALB"
SubnetId:
Type: List<AWS::EC2::Subnet::Id>
Description: Subnet for ALB
SecurityGroup:
Type: List<AWS::EC2::SecurityGroup::Id>
Description: SecurityGroup for ALB
Domain:
Type: String
Description: Domain name for ALB
Resources:
ALB:
Type: AWS::ElasticLoadBalancingV2::LoadBalancer
Properties:
Name: !Sub ${Prefix}-${Env}-${Project}-alb
Type: application
Scheme: internet-facing
Subnets: !Ref SubnetId
SecurityGroups: !Ref SecurityGroup
LoadBalancerAttributes:
- Key: idle_timeout.timeout_seconds
Value: 60
- Key: access_logs.s3.enabled
Value: True
- Key: access_logs.s3.bucket
Value:
Fn::ImportValue: !Sub ${Project}-aws-resource-access-logs-s3-bucket-name
- Key: "access_logs.s3.prefix"
Value: !Sub elb/${Prefix}/${Prefix}-${Env}-${Project}-alb
ALBHttpsListener:
Type: AWS::ElasticLoadBalancingV2::Listener
Properties:
Certificates:
- CertificateArn: !ImportValue acm-arn
DefaultActions:
- Type: fixed-response
FixedResponseConfig:
ContentType: text/plain
MessageBody: Access denied
StatusCode: 403
LoadBalancerArn: !Ref ALB
Port: 443
Protocol: HTTPS
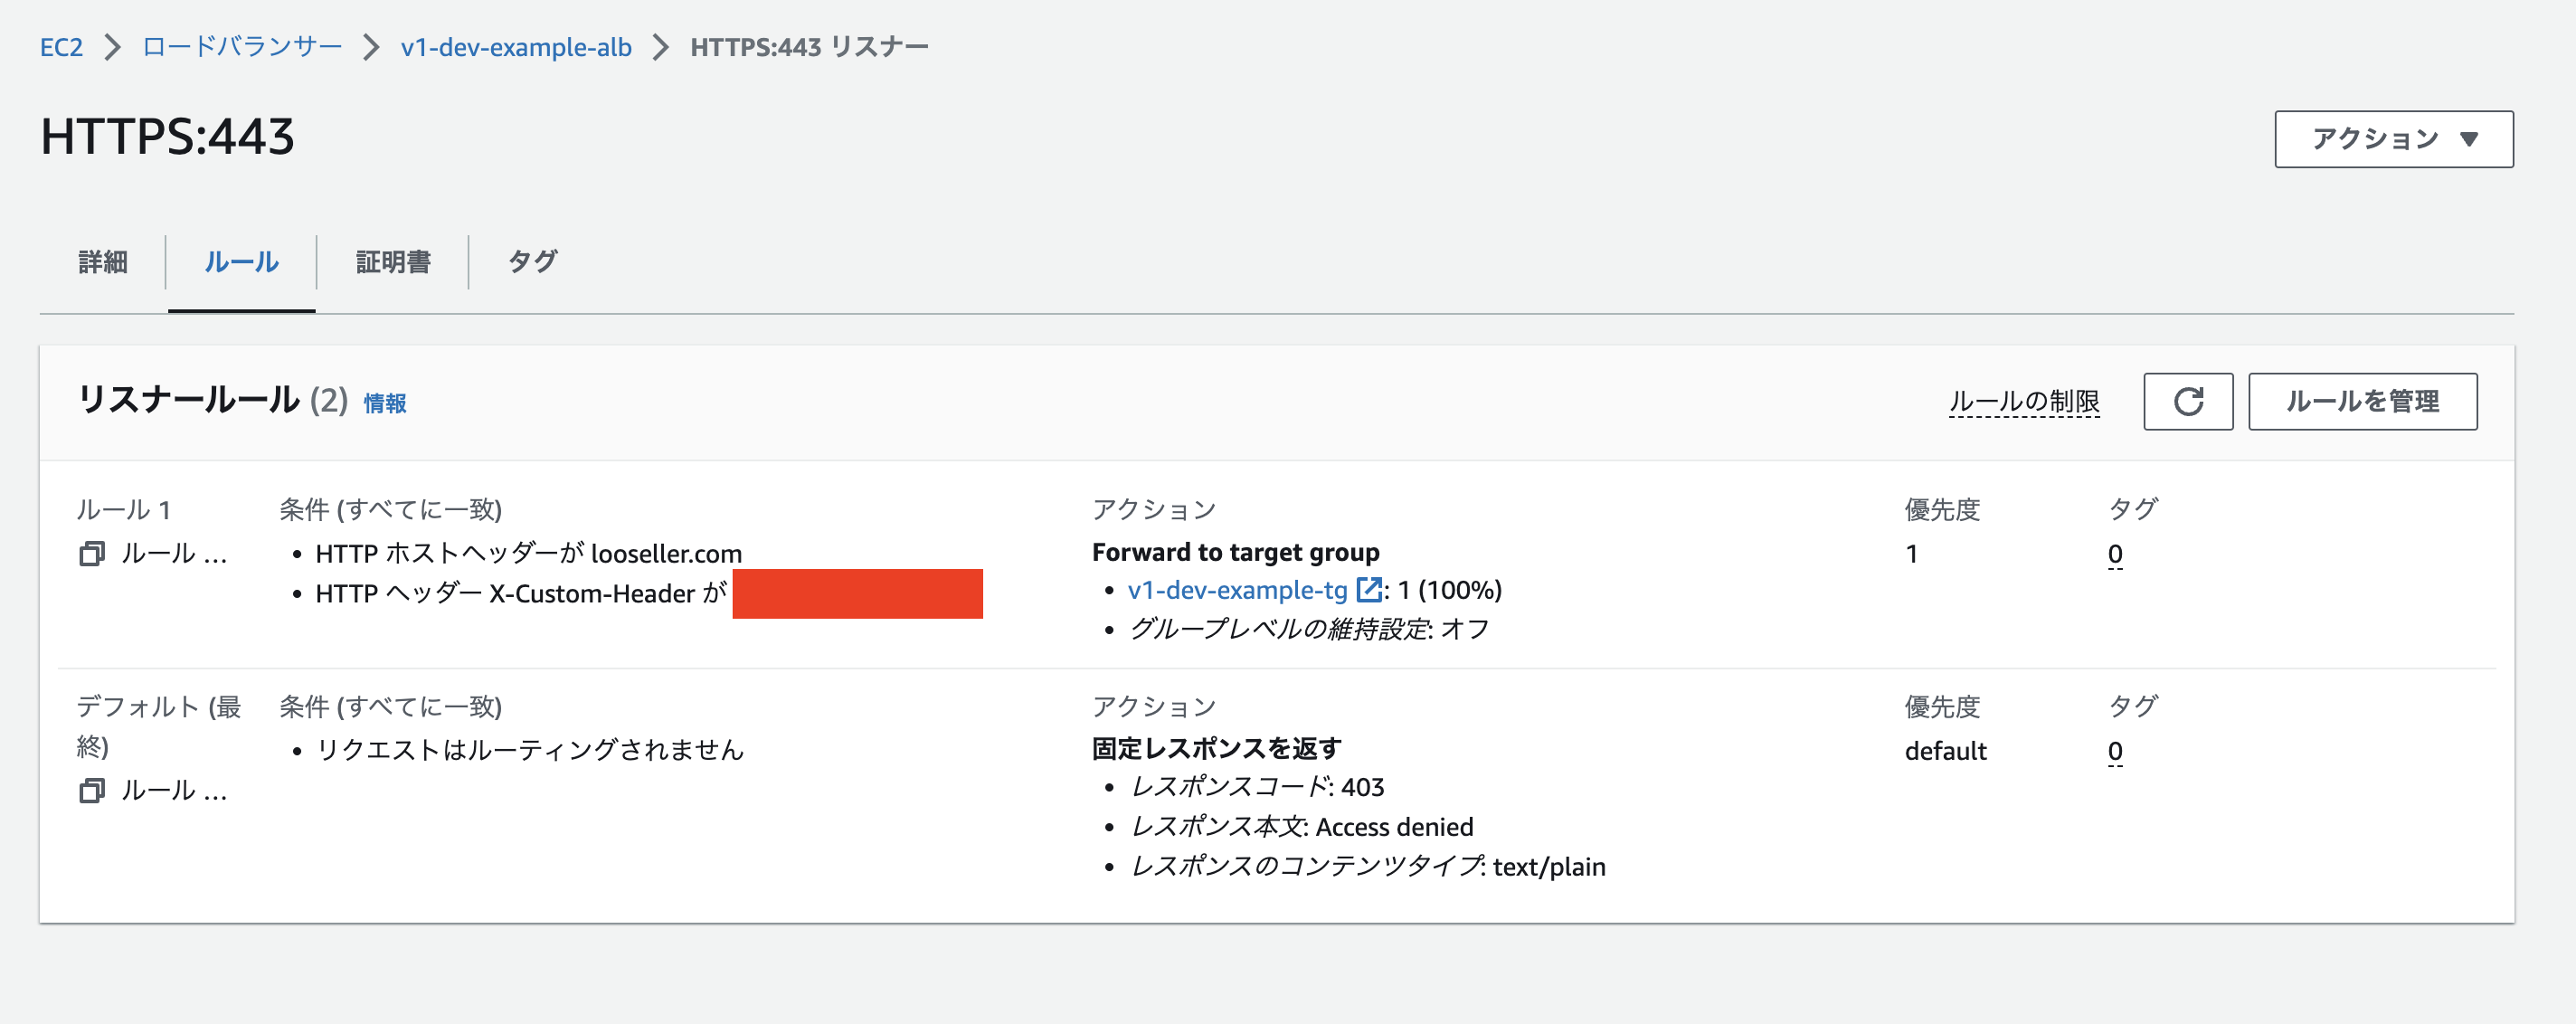
ALBHttpsLisnerRule:
Type: AWS::ElasticLoadBalancingV2::ListenerRule
Properties:
Priority: 1
ListenerArn: !Ref ALBHttpsListener
Actions:
- Type: forward
TargetGroupArn: !Ref ALBTG
Conditions:
- Field: host-header
Values:
- !Sub ${Domain}
- Field: http-header
HttpHeaderConfig:
HttpHeaderName: "{{resolve:secretsmanager:cf-custom-header:SecretString:CLOUDFRONT_CUSTOM_HEADER_NAME}}"
Values:
- "{{resolve:secretsmanager:cf-custom-header:SecretString:CLOUDFRONT_CUSTOM_HEADER_VALUE}}"
ALBTG:
Type: AWS::ElasticLoadBalancingV2::TargetGroup
Properties:
Name: !Sub ${Prefix}-${Env}-${Project}-tg
HealthCheckIntervalSeconds: 30
HealthCheckPath: /
HealthCheckPort: traffic-port
HealthCheckProtocol: HTTP
HealthCheckTimeoutSeconds: 5
HealthyThresholdCount: 5
UnhealthyThresholdCount: 3
Matcher:
HttpCode: 200
Port: 80
Protocol: HTTP
TargetGroupAttributes:
- Key: deregistration_delay.timeout_seconds
Value: 30
TargetType: instance
VpcId: !Ref VpcId
Outputs:
ALBDNSName:
Description: Output Export AWS::ElasticLoadBalancingV2::LoadBalancer.DNSName
Value: !GetAtt ALB.DNSName
Export:
Name: !Sub ${Prefix}-${Env}-${Project}-alb-dns
ALBName:
Description: Output Export AWS::ElasticLoadBalancingV2::LoadBalancer.LoadBalancerName
Value: !GetAtt ALB.LoadBalancerName
Export:
Name: !Sub ${Prefix}-${Env}-${Project}-alb-name
ALBTGArn:
Description: Output Export AWS::ElasticLoadBalancingV2::TargetGroup.Ref
Value: !Ref ALBTG
Export:
Name: !Sub ${Prefix}-${Env}-${Project}-tg-arn
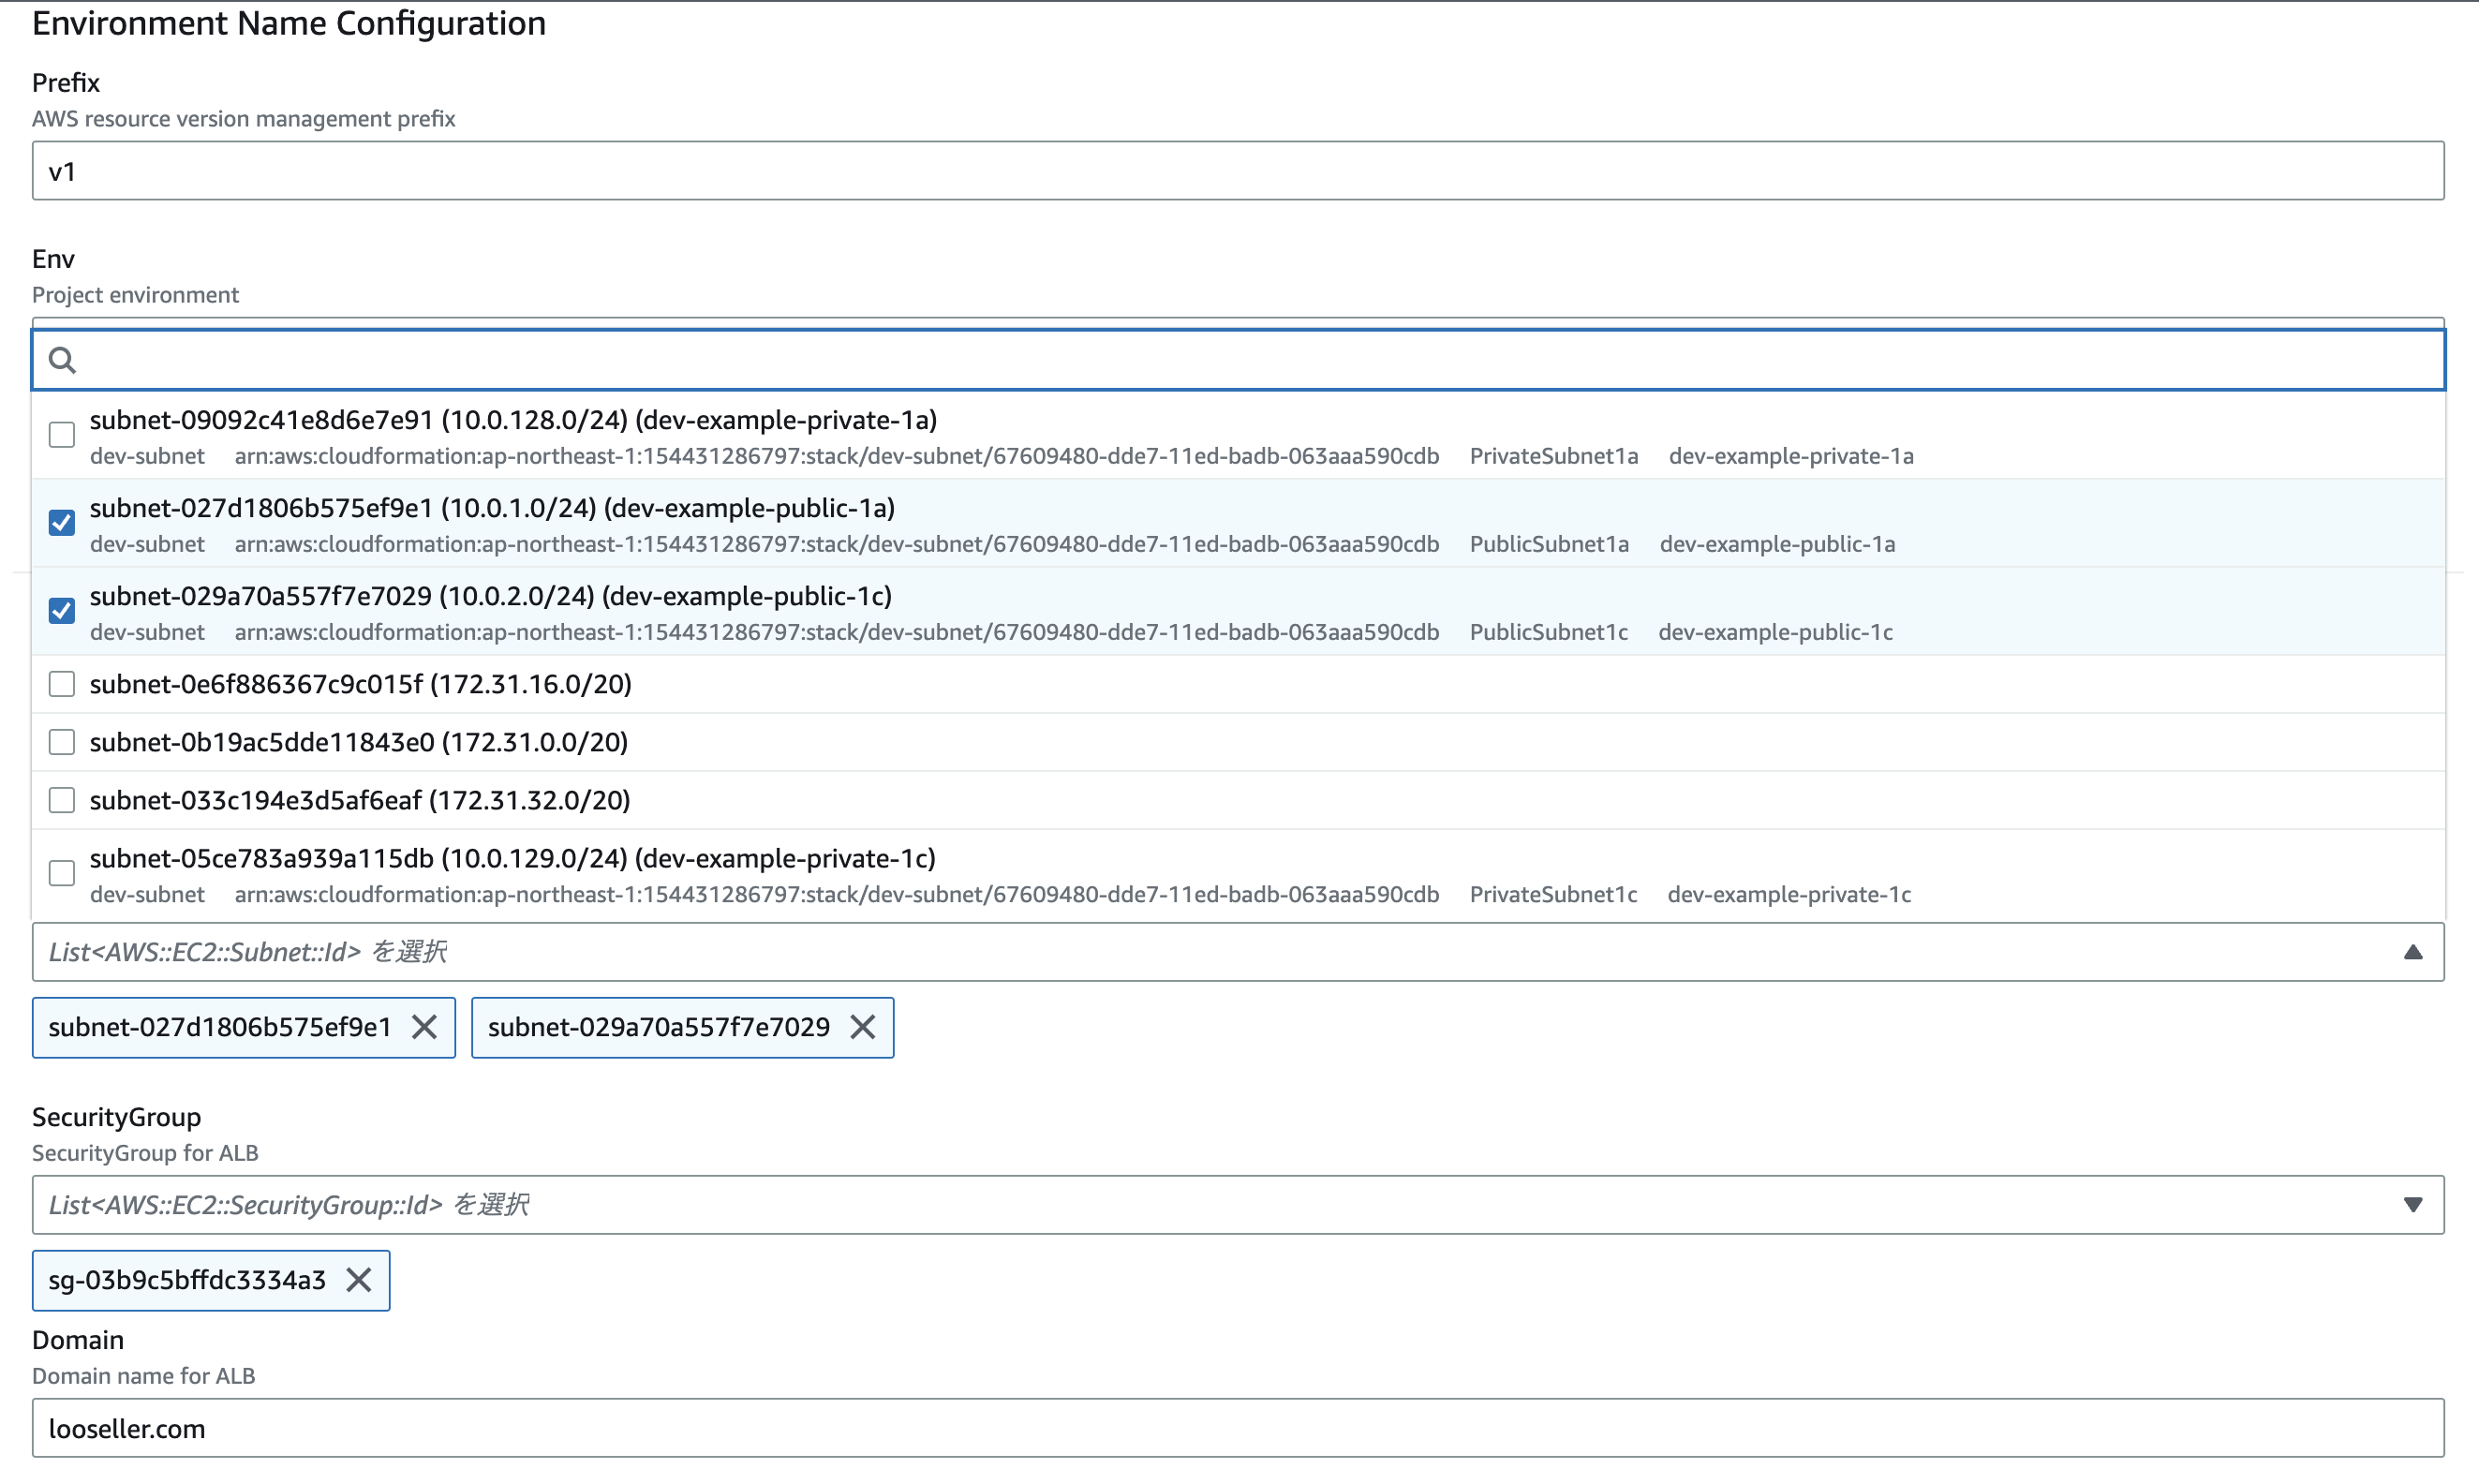
ParametersのPrefixはデフォルトにするためスタック名はv1-dev-alb
VpcId・SubnetId・SecurityGroupはImportValueではなくParametersで選択できるようにしました。前の記事で作成したAWSリソースを選択してください。
SubnetIdは、PublicSubnetを選択してください。SecurityGroupはロードバランサー用を選択してください。
$ curl -ik https://v1-dev-example-alb-1528051662.ap-northeast-1.elb.amazonaws.com
HTTP/2 403
server: awselb/2.0
date: Sat, 06 May 2023 04:32:08 GMT
content-type: text/plain; charset=utf-8
content-length: 13

Access denied


$ curl -ik https://54.64.156.106
HTTP/2 403
server: awselb/2.0
date: Sat, 06 May 2023 04:33:00 GMT
content-type: text/plain; charset=utf-8
content-length: 13

Access denied
CloudFront
次にCDNのCloudFrontを作成していきます。これもPrefix込みの命名で作成していきます。
.pre-commit-config.yaml
cloudformation
 L iam-user.yaml
   iam-role.yaml
   cloudtrail.yaml
   vpc.yaml
   subnet.yaml
   sg.yaml
   route53.yaml
   acm.yaml
   s3-bucket.yaml
   secretsmanager.yaml
   prefix
    L alb.yaml
      cf.yaml(new)
AWSTemplateFormatVersion: "2010-09-09"
Description: "stackName: {Prefix}-{Env}-cf. AWS::CloudFront::Distribution"

Metadata:
  AWS::CloudFormation::Interface:
    ParameterGroups:
      - Label:
          default: Environment Name Configuration
        Parameters:
          - Prefix
          - Env
          - Project
      - Label:
          default: Resource Configuration
        Parameters:
          - Domain
          - ACM

Parameters:
  Prefix:
    Type: String
    Description: Resorce prefix
    Default: v1
  Env:
    Type: String
    Description: Project environment
    AllowedValues: [dev, prd]
  Project:
    Type: String
    Description: Project Name
    Default: example
  Domain:
    Type: String
    Description: CloudFront DomainAliases
  ACM:
    Type: String
    Description: us-east-1 ACM ARN
    Default: arn:aws:acm:us-east-1:xxxxxxxxxxxx:certificate/xxxxxxxx-xxxx-xxxx-xxxx-xxxxxxxxxxxx

Mappings:
  EnvMaps:
    common:
      CloudFrontHostedZoneId: Z2FDTNDATAQYW2
    dev:
      ManagedRequestPolicyAllViewer: 216adef6-5c7f-47e4-b989-5492eafa07d3 # https://docs.aws.amazon.com/AmazonCloudFront/latest/DeveloperGuide/using-managed-origin-request-policies.html
      ManagedCachePolicyCachingDisabled: 4135ea2d-6df8-44a3-9df3-4b5a84be39ad # https://docs.aws.amazon.com/ja_jp/AmazonCloudFront/latest/DeveloperGuide/using-managed-cache-policies.html
    prd:
      ManagedRequestPolicyAllViewer: 216adef6-5c7f-47e4-b989-5492eafa07d3
      ManagedCachePolicyCachingDisabled: 4135ea2d-6df8-44a3-9df3-4b5a84be39ad

Resources:
  CFDistribution:
    Type: AWS::CloudFront::Distribution
    Properties:
      DistributionConfig:
        Comment: !Sub ${Prefix}-${Env}-${Project}-cf
        Aliases:
          - !Ref Domain
        Origins:
          - DomainName:
              Fn::ImportValue: !Sub ${Prefix}-${Env}-${Project}-alb-dns
            Id: default
            CustomOriginConfig:
              HTTPSPort: 443
              OriginProtocolPolicy: https-only
            OriginCustomHeaders:
              - HeaderName: "{{resolve:secretsmanager:cf-custom-header:SecretString:CLOUDFRONT_CUSTOM_HEADER_NAME}}"
                HeaderValue: "{{resolve:secretsmanager:cf-custom-header:SecretString:CLOUDFRONT_CUSTOM_HEADER_VALUE}}"
        Enabled: true
        HttpVersion: http2
        IPV6Enabled: true
        PriceClass: PriceClass_All
        DefaultCacheBehavior:
          TargetOriginId: default
          AllowedMethods: ["DELETE", "GET", "HEAD", "OPTIONS", "PATCH", "POST", "PUT"]
          ViewerProtocolPolicy: redirect-to-https
          CachePolicyId: !FindInMap [EnvMaps, !Ref Env, ManagedCachePolicyCachingDisabled]
          OriginRequestPolicyId: !FindInMap [EnvMaps, !Ref Env, ManagedRequestPolicyAllViewer]
        ViewerCertificate:
          AcmCertificateArn: !Ref ACM
          SslSupportMethod: sni-only
          MinimumProtocolVersion: TLSv1.2_2021
        Logging:
          IncludeCookies: true
          Bucket:
            Fn::ImportValue: !Sub ${Project}-aws-resource-access-logs-s3-bucket-domain-name
          Prefix: !Sub cloudfront/${Prefix}/${Prefix}-${Env}-${Project}-cf

  PublicHostedZoneRecord:
    Type: AWS::Route53::RecordSet
    Properties:
      HostedZoneId: !ImportValue public-hosted-zone-id
      Name: !Ref Domain
      Type: A
      AliasTarget:
        HostedZoneId: !FindInMap [EnvMaps, common, CloudFrontHostedZoneId]
        DNSName: !GetAtt CFDistribution.DomainName
スタック名はv1-dev-cf
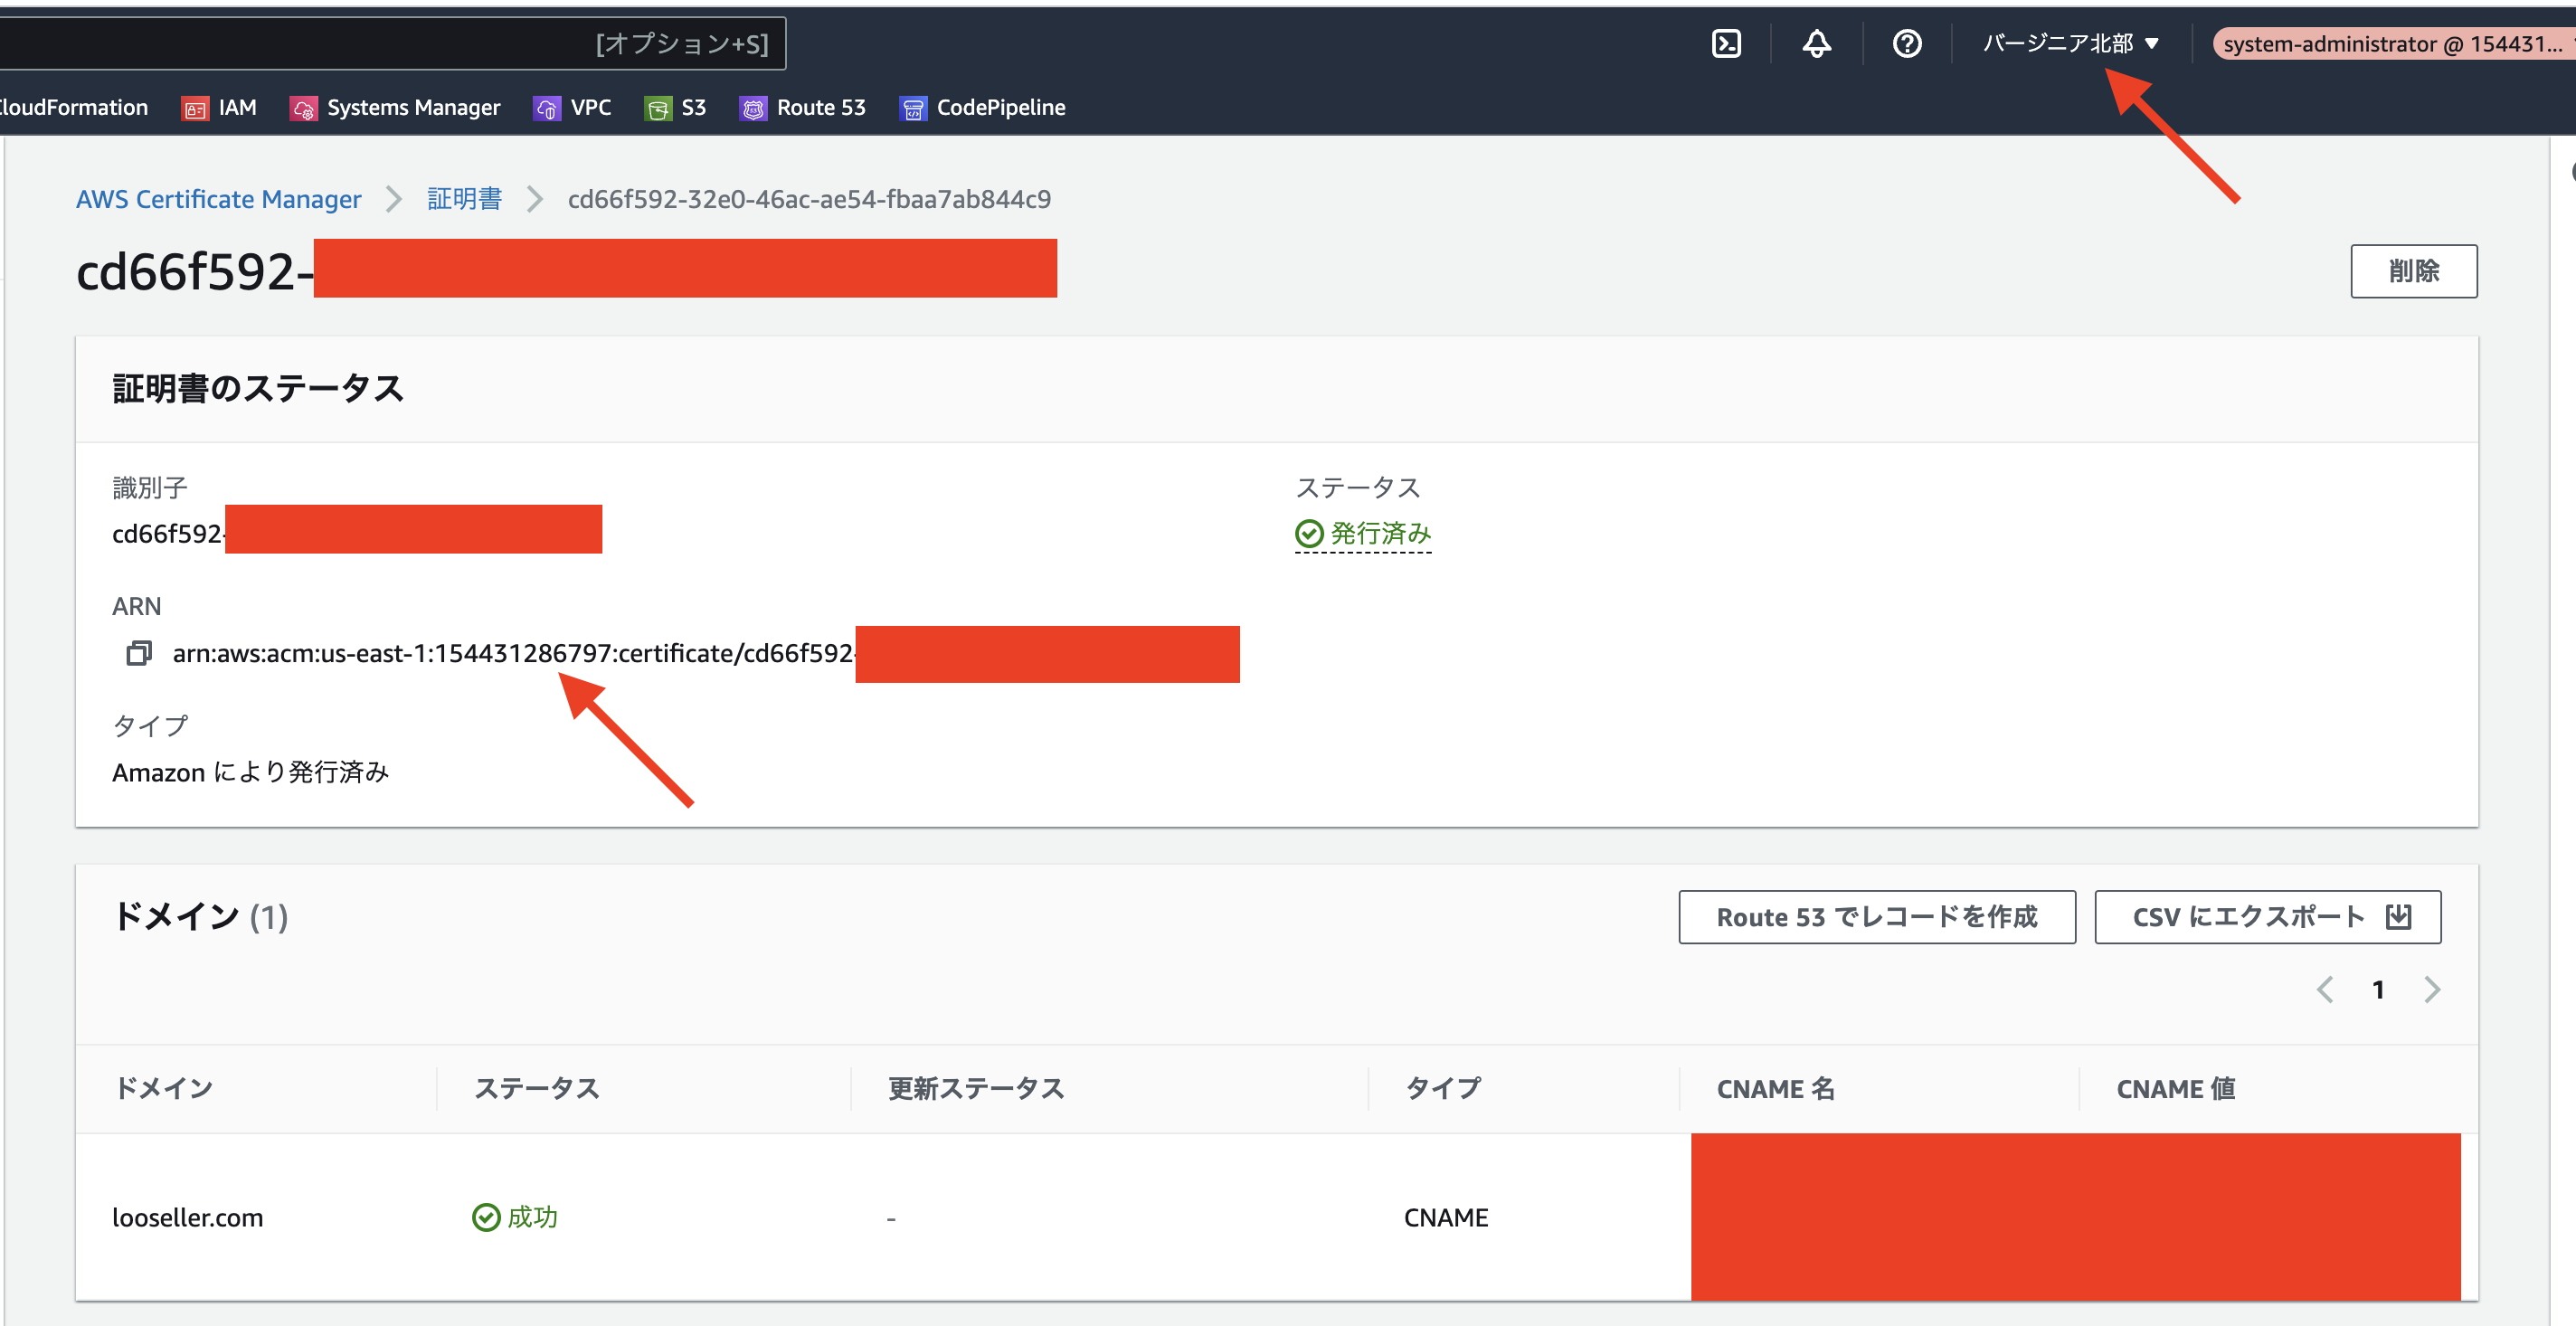
ACMはロードバランサーと違いParametersで指定します。これは、ドメイン編にも記載した通り別のリージョンで作成したスタックは参照できないため手動で指定する必要があります。CloudFrontはバージニア北部のACMが必要なためARNを直指定します。
画像で一様ACMのリソース名はマスクしています。AWSのアカウントIDはこの前公式で機密情報でないと正式に出たので出しちゃいます。
また、CloudFrontとロードバランサーは、https(443)のみしか許可しないようにしているためビヘイビアで強制的にhttpsリダイレクトする設定をしています。
cf.yamlでroute53のリソースを作成しているのですが、Prefixがあるためroute53.yamlで管理するのが困難なため同じテンプレート内で作成します。
CloudFrontをCFnでRoute53のレコードを作成するときは、HostedZoneIdにZ2FDTNDATAQYW2を指定します。
これでリクエストの通り道は作成できました!ただサーバーはまだ作成していないためリクエストすると503のレスポンスが返ってきます。
$ curl -i https://looseller.com
HTTP/2 503
content-type: text/html
content-length: 162
server: awselb/2.0
date: Sat, 06 May 2023 14:24:41 GMT
x-cache: Error from cloudfront
via: 1.1 7697ece088dd82b674ad39d943b690c8.cloudfront.net (CloudFront)
x-amz-cf-pop: NRT12-C3
x-amz-cf-id: kQEq8oR1crwuWNrfrhIxo1byHjk86oFypYuOkFW0IV17kX6T1HCRrA==

<html>
<head><title>503 Service Temporarily Unavailable</title></head>
<body>
<center><h1>503 Service Temporarily Unavailable</h1></center>
</body>
</html>
終わりに
今回は結構CFnを記載しました。Prefixで急にテンプレートを分け始めたので「なんで?」って思った方もいらっしゃるかもしれません。ただAWSを運用していく上で上記のような切り分けが良い方向になるのではないかなと思っています。最初に運用は考えないって言ってたじゃないかって思った方申し訳ございません_(_(┐・ω・)┐
次はECS周りのコンテナ部分を作成していきます。次もボリュームが多いため頑張ってみていただけると嬉しいです。